
Free Background Remover Tool — Private, No Uploads or Sign-Up

This free background remover tool lets you remove image backgrounds directly in your browser, with no uploads, no sign-up, and no subscription required.

Private browser-based image tool
Free Background Remover Tool
Remove image backgrounds directly in your browser. No uploads, no sign-up, and no subscription required.
Tip: If the AI removes part of the subject, choose Restore Subject and paint it back in. If it leaves background behind, choose Erase Background.
Live preview
Your cutout

Free Background Remover Tool — Private, No Uploads or Sign-Up
Need to remove the background from an image without uploading it to another website, creating an account, or paying for another subscription?
This free background remover tool lets you cut out the main subject of your image directly in your browser. You can upload a photo, remove the background, preview the result, clean up the edges, restore missing parts of the subject, erase leftover background areas, and download the final image as a transparent PNG.
It is designed for bloggers, YouTubers, content creators, small business owners, affiliate marketers, and anyone who needs quick transparent images for online content.
You can use it for profile pictures, YouTube thumbnails, blog graphics, product images, social media posts, lead magnets, simple design assets, and more.
What Is a Background Remover Tool?
A background remover tool separates the main subject of an image from everything behind it.
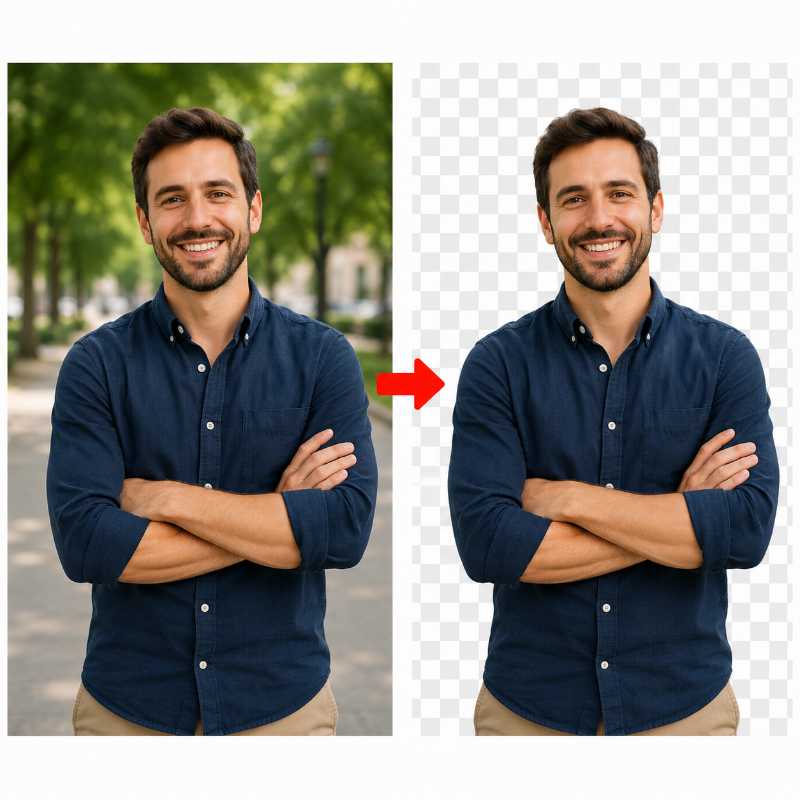
For example, you might have a photo of a person standing in front of trees, a product sitting on a desk, or an object placed against a messy background. A background remover tries to detect the subject and remove the surrounding area, leaving the subject on a transparent background.
The finished image is usually downloaded as a PNG file because PNG supports transparency. That means you can place the cutout on top of a new background, inside a YouTube thumbnail, over a blog image, or into a design tool like Canva.
Instead of trying to manually trace around the subject with complicated editing software, a background remover gives you a faster starting point.
Why Use a Browser-Based Background Remover?
Many online image tools require you to upload your image to their server before they process it.
That may be fine for some images, but it is not always ideal.
You might be editing personal photos, client images, product photos, brand graphics, or screenshots you do not want to upload somewhere else. You might also just want a fast tool without joining another platform, confirming another email, or dealing with another subscription pop-up.
This free background remover tool is built to run in your browser. That means the background removal happens locally where possible, rather than forcing you through a cloud upload workflow.
That gives you a simple trade-off:
You get more privacy and convenience, but some images may take a little longer depending on your computer, browser, and image size.
For most creator tasks, that is a worthwhile trade.
How to Use the Free Background Remover Tool
The tool is designed to be simple, but it also includes manual cleanup options for images that need a little extra work.
Here is the basic process:
- Choose an image from your computer.
- Select your cutout quality.
- Click Remove Background.
- Wait while the background is removed in your browser.
- Preview the result on checkerboard, white, or black backgrounds.
- Zoom in if you need to inspect the edges.
- Use Move Image to drag around the zoomed preview.
- Use Restore Subject if too much of the subject was removed.
- Use Erase Background if leftover background edges remain.
- Use Undo or Redo if you make a mistake.
- Download the final transparent PNG.
One quick note: because the AI cutout happens in your browser, Chrome may occasionally show a “page unresponsive” warning near the end of processing. If that happens, click Wait. In many cases, the finished cutout appears a few seconds later.
What Can You Use Transparent Background Images For?
Transparent PNG images are incredibly useful if you create content online.
Once the background is removed, you can reuse the subject in different designs without being stuck with the original photo background.
Here are a few common uses:
- YouTube thumbnails
- Blog featured images
- Pinterest pins
- Facebook posts
- Instagram graphics
- Profile pictures
- Product mockups
- Website banners
- Email graphics
- Lead magnet covers
- Course graphics
- Simple Canva designs
For example, if you are making a YouTube thumbnail, you can cut yourself out of a normal photo and place your image over a bright background, screenshot, graphic, or bold text layout.
If you are creating a blog post image, you can remove the background from a person, product, or object and build a cleaner featured image around it.
If you sell products, you can remove distracting backgrounds and create cleaner images for your website, landing pages, or social media posts.
When the AI Cutout Is Not Perfect
AI background removal is powerful, but it is not magic.
Some images are harder than others.
Hair, hands, shadows, low contrast edges, busy backgrounds, transparent objects, and backgrounds that are similar in color to the subject can all confuse the cutout.
That is why this tool includes repair controls.
If the background remover removes part of the subject, use Restore Subject to paint that missing area back in.
If the background remover leaves unwanted edges, use Erase Background to clean them up.
If you need more precision, use the zoom controls to enlarge the image and then use Move Image to drag around the preview while you work on the edges.
This gives you more control than a simple one-click remover.
The goal is not to replace professional Photoshop editing. The goal is to give you a fast, private, browser-based tool that handles everyday creator tasks without unnecessary friction.
📢 Shareable Insight
“A background remover gets you 90% of the way there, but the final 10% is where clean edges, better thumbnails, and professional-looking images are made.”
👉 Click to Tweet
If you want to add similar shareable quote blocks to your own posts, the Click To Tweet Generator Tool can help you create clean tweet-ready links without messing around with manual URL encoding.
Tips for Better Background Removal Results
You will usually get better results when your image has a clear subject and decent contrast between the subject and the background.
For example, a person standing in front of a simple wall will usually be easier to cut out than a person standing in front of trees, shadows, furniture, and other people.
Here are a few practical tips:
Use images where the subject is clear and not too blurry.
Try to avoid backgrounds that are almost the same color as the subject.
Preview the finished cutout on different backgrounds. Checkerboard is useful for transparency, but black and white previews can make leftover edges easier to spot.
Use a smaller brush size when cleaning up fine details.
Zoom in before working around hair, fingers, shoulders, clothing edges, or product outlines.
Use Undo and Redo while cleaning up, especially if you are working near important edges.
If one image gives a rough result, try another photo with better lighting or clearer subject separation.
Browser-Based Privacy vs Cloud-Based Background Removers
A cloud-based background remover uploads your image to a server, processes it, and sends the result back.
That can be fast and powerful, but it also means your image leaves your device.
A browser-based background remover is different. It is designed to process the image locally in your browser, which gives you a more private workflow and removes the need for sign-ups, accounts, or uploads.
The downside is that your own device and browser have to do the work. On some images, especially larger or more complex ones, processing may take longer or briefly make the browser feel frozen.
That is why this tool includes a warning near the remove button. If the browser says the page is unresponsive, click Wait before giving up. The result may be seconds away from appearing.
Who Is This Tool Best For?
This free background remover tool is best for people who need quick image cutouts without opening advanced design software.
It is especially useful for:
- Bloggers creating featured images
- YouTubers making thumbnails and scripts
- Content creators making social graphics
- Small business owners editing product images
- Affiliate marketers creating promotional images
- Website owners preparing graphics
- Course creators building simple assets
- Anyone who needs a transparent PNG quickly
If you create content regularly, background removal is one of those small tasks that comes up again and again.
Having a simple tool you can use without logging in or uploading files makes the whole process faster.
And if you are publishing full tool pages, tutorials, and supporting articles, the Internal Linking Tool can help you connect related content naturally without turning your post into a link-stuffed mess.
📢 Shareable Insight
“One-click background removal is useful, but edge cleanup is what turns a quick cutout into an image worth publishing.”
👉 Click to Tweet
Final Thoughts
This free background remover tool was built for one simple reason:
Sometimes you just need to remove an image background quickly, privately, and without signing up for anything.
It is not meant to replace advanced professional image editing software. But for everyday creator tasks, it gives you a fast way to remove backgrounds, clean up edges, restore missing subject areas, and download a transparent PNG.
If you publish your own free tools, tutorials, or resource pages, you can also use the Free Backlink Opportunity Finder and Free Broken Link Checker to find realistic promotion and outreach angles without relying on expensive SEO tools.
Use the tool above to remove your image background, then check out the full free tools section for more blogging, SEO, image editing, and content creation tools.
👉 Blogging and SEO Tool Suite
Frequently Asked Questions
Is this background remover really free to use?
Yes, the tool is designed to be free to use without forcing you through a sign-up, payment screen, or trial wall. That makes it useful for quick edits when you just need a clean cutout for a blog image, product photo, thumbnail, social post, or design mockup. You can remove a background, repair small problem areas, and download the result without having to create an account first.
Does the tool upload my image to a server?
No. The main privacy benefit is that the background removal happens in your browser instead of requiring you to upload the image to a remote server. That is especially useful when you are editing personal photos, draft product images, client visuals, or anything you would rather not send through a third-party upload system. You still need to use common sense with sensitive images, but browser-based editing is a strong privacy advantage.
What types of images work best with a background remover?
Background removers usually work best when the subject is clearly separated from the background. A person, product, pet, tool, or object on a plain or lightly contrasting background will usually give a cleaner result. Busy backgrounds, shadows, hair, transparent objects, and low-resolution images can be harder. For best results, start with the clearest image you have rather than trying to rescue a blurry or heavily compressed file.
Why does the edge sometimes look rough after removing the background?
Rough edges usually happen when the image has fine details, motion blur, shadows, hair, fur, reflections, or similar colors between the subject and background. The tool can often make a strong first pass, but some images still need small repairs. That is why repair tools matter. Instead of expecting a perfect one-click result every time, check the edges closely and clean up any areas where the background was missed or the subject was accidentally removed.
Can I use the removed-background image for blog posts?
Yes, transparent-background images can work well in blog posts, especially for tool screenshots, product-style visuals, comparison images, featured graphics, and tutorial illustrations. After removing the background, you may also want to reduce the file size before uploading it to WordPress. A tool like the browser-based image compressor can help make the image lighter so your page does not become unnecessarily slow.
Can I remove the background from product photos?
Yes, this kind of tool can be very useful for simple product-style images. It can help you place a product on a clean background, create comparison graphics, or make an object stand out in a blog post or sales page. The cleaner the original photo, the better the result. If the product has reflective surfaces, glass, fine wires, or shadows, zoom in after processing and use the repair tools to tidy the edges.
Can I use the tool for YouTube thumbnails?
Yes, removing a background can make YouTube thumbnails look much more polished. You can cut out a person, object, screenshot, product, or visual element and place it over a brighter or more dramatic background. This helps create stronger contrast and clearer focus. Just make sure the final thumbnail still looks natural and readable at small sizes, because most people will see it on a phone or in a crowded feed.
What is the best image format after removing a background?
If you want to keep the background transparent, PNG is usually the best choice because it supports transparency. JPG does not support transparent backgrounds, so it will normally replace the empty area with a solid color. WebP can also support transparency in many situations, but PNG is often the simplest option when you want a clean cutout that can be used in blog graphics, thumbnails, and design tools.
Will removing the background reduce image quality?
Removing the background does not automatically ruin image quality, but the final result depends on the original file and how much editing is needed. A clear, high-resolution image usually gives you a better cutout. A tiny, blurry, or heavily compressed image may look rough even after the background is removed. If quality matters, start with the best version of the image, then resize or compress it only after the cutout looks clean.
What should I do if part of the subject gets removed by mistake?
Use the repair or restore option to bring back the missing part of the subject. This can happen around hair, hands, clothing edges, thin objects, or areas where the subject blends into the background. Work slowly and zoom in if the tool allows it. It is usually better to make small repairs than to try to fix the whole image in one big pass.
What should I do if the tool leaves bits of background behind?
Use the erase or cleanup option to remove leftover background fragments. This often happens around shadows, corners, gaps between objects, or areas with similar colors. Check the image on both light and dark backgrounds if possible, because some leftover marks are hard to see on one background but obvious on another. A quick edge check before downloading can save you from uploading a messy image later.
Is a private background remover better than an online upload tool?
It depends on what you need, but privacy is the big advantage of a browser-based background remover. Many online tools require you to upload your image before processing it. A private, no-upload tool is better when you want quick edits without sending files away. Upload-based tools may still offer advanced features, but for everyday image cutouts, browser-based processing is often simpler and more comfortable.
Can I use removed-background images in QR code graphics?
Yes, cutout images can be useful when creating branded QR code graphics, especially if you want a cleaner logo, product image, or profile-style visual in your design. Just keep the final QR code easy to scan. If you are creating a QR code with a logo or image, you can test it with the free QR code generator with logo and check it on your phone before publishing.
Can I use this tool for social media images?
Yes, background removal is great for social media graphics because it helps the main subject stand out. You can cut out a person, product, logo, object, or screenshot and place it on a clean branded background. This works well for quote graphics, tutorial posts, announcement images, and promotional visuals. The key is not to overdo it. A clean cutout with strong spacing usually looks better than a cluttered design.
Do I need design experience to use a background remover?
No. The basic workflow is simple: choose an image, remove the background, inspect the edges, repair any problem spots, and download the result. You do not need to be a professional designer. That said, a little care makes a big difference. Check the edges, avoid using poor-quality images, and make sure the cutout looks natural in the final place you use it.
What are the most common mistakes people make with background remover tools?
The biggest mistakes are starting with a poor-quality image, skipping the edge check, downloading the wrong format, and using the cutout on a background where rough edges become obvious. Another common mistake is expecting every image to be perfect in one click. Background removal is fast, but some images still need a small amount of cleanup. A few extra seconds of repair can make the final image look much more professional.
Can this tool help with website speed?
Indirectly, yes. Removing a background can help you create cleaner visuals, but website speed depends more on final image dimensions and file size. After editing, avoid uploading huge image files if the display size is much smaller. Resize and compress images before adding them to WordPress or your website. This keeps your visuals looking sharp without making the page heavier than it needs to be.
How can I plan content around image tools like this?
If you are building blog content around image editing, helpful tool pages, or creator resources, it is worth planning the cluster properly instead of publishing random posts. You could create tutorials, mistake guides, comparison posts, and workflow articles around image editing tasks. The SEO Content Planner Tool can help turn one tool idea into a stronger group of related content topics.
Should I add FAQs to a tool page like this?
Yes, FAQs can make a tool page more useful because they answer the questions people often have before using the tool. They can also support long-tail search intent by covering privacy, file types, image quality, use cases, mistakes, and next steps. If you are creating FAQ sections for other posts or tools, the FAQ Generator can help you create a stronger starting point.
What should I do after removing an image background?
After removing the background, check the edges, save the image in the right format, and use it where it adds visual value. For a transparent cutout, PNG is usually the safest choice. For website use, think about size and loading speed before uploading. You can also reuse the same cutout across blog graphics, thumbnails, social posts, email visuals, and simple promotional designs.


I have been browsing online more than 2 hours today, yet I never found any interesting article like yours.
It’s pretty worth enough for me. In my opinion, if
all website owners and bloggers made good content as you
did, the web will be much more useful than ever before.