
Free Internal Linking Tool for Blog Posts & SEO Optimization
Use this free internal linking tool to scan your blog post, check existing links, generate a smarter AI prompt, and verify the final HTML before you paste it back into WordPress. It helps you add relevant internal links without duplicate URLs, messy anchor text, broken formatting, or accidentally changing your calls to action.

Internal Linking Tool
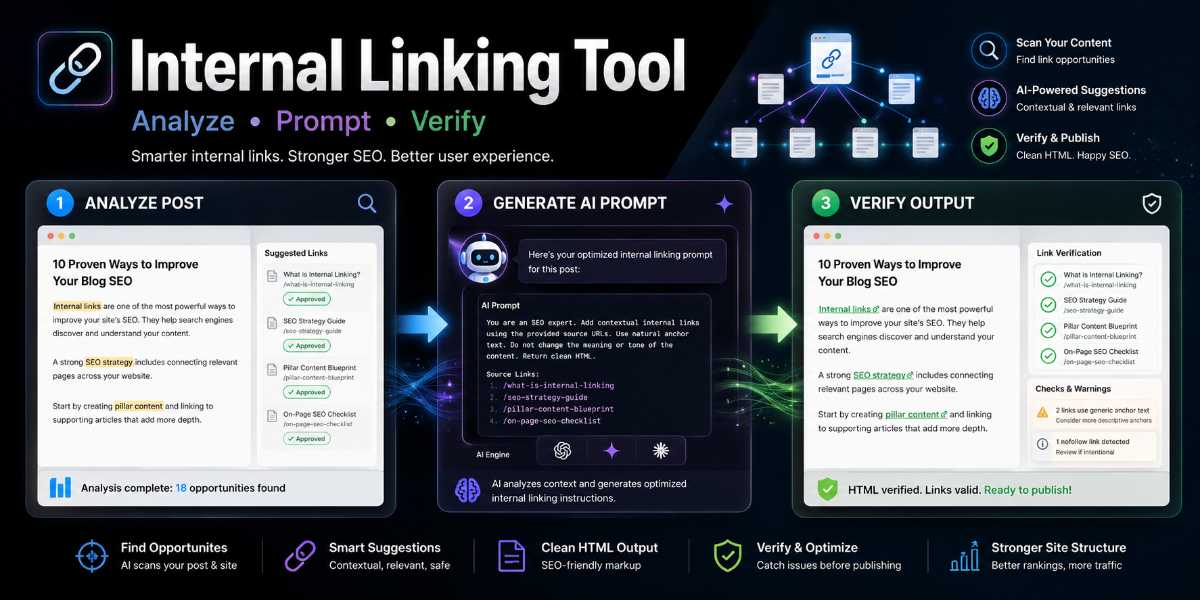
Scan a finished blog post, detect existing links, protect risky code blocks, compare your approved internal link list, and generate a strict AI prompt for contextual internal link insertion.
Tool workflow
- 1Paste your completed WordPress HTML or article content.
- 2Paste approved internal links from your spreadsheet.
- 3Generate an AI prompt that avoids duplicate links and protects code blocks.
- 4Verify the AI output before pasting it back into WordPress.
1. Article details
Add the basic SEO context so the AI understands what the post is about before inserting internal links. The current post URL lets the tool prevent accidental self-links.
2. Approved internal links
Paste links from your spreadsheet. Use one link per line. Use Title | URL when the URL slug does not clearly explain the page.
3. Completed blog post
For best formatting preservation, paste from the WordPress Code Editor. The tool can still work with plain article text, but HTML gives better control over headings, bold text, existing links, and FAQ sections.
4. Link audit
This report updates when you analyze the post or generate the prompt.
No audit yet
- Paste your article and approved links, then click Analyze Post.
5. AI prompt
Copy this prompt into ChatGPT after generating it. The prompt tells AI to preserve formatting, use contextual anchors, avoid duplicate contextual URLs, and return a change report.
6. Verify AI output
Paste the AI-returned article here to check for duplicate URLs, missing new-tab attributes, accidental Markdown links, raw URLs, and protected placeholder issues.
Do not paste the raw AI response directly into WordPress. After verification, use the Copy Final WordPress HTML button below so protected blocks, tools, scripts, embeds, ads, and Custom HTML blocks are restored before you update your page.
Use this button for the final version you paste back into WordPress. It rechecks the output and restores protected blocks before copying.
No verification yet
- Paste the AI output above, then click Verify Output. Then use Copy Final WordPress HTML for the version you paste back into WordPress.

Watch The Instructional Video HERE

This Could Be Your Easiest SEO Win
Internal linking is one of the easiest SEO wins most bloggers still mess up.
Not because it is complicated.
It is usually because it is boring, repetitive, and surprisingly easy to get wrong.
You open an old blog post, try to remember which related articles you have already written, add a few links where they seem to fit, then hope you have not linked the same page five times, used weak anchor text, or accidentally broken your WordPress HTML.
That is exactly why I built this free internal linking tool.
It helps you scan a blog post, review existing links, add approved internal link targets, generate a structured AI prompt, and verify the final HTML before you paste anything back into WordPress.
In other words, it gives you a safer workflow for improving internal links without turning your post into a messy SEO experiment.
👉 Use the Free Internal Linking Tool above to analyze your post, generate an AI prompt, and verify your internal links before updating WordPress.
What Is an Internal Linking Tool?
An internal linking tool helps you find opportunities to link from one page on your website to another relevant page on the same website.
For example, if you write a blog post about on-page SEO, it might make sense to link to related articles about keyword research, meta descriptions, internal linking strategy, content clusters, or SEO tools.
Those links help readers find useful related content.
They also help search engines understand how your site is structured.
A good internal linking tool should help you answer questions like:
- Which links already exist in this post?
- Which approved URLs could be added naturally?
- Am I linking to the current post by mistake?
- Am I using the same target URL too many times?
- Are links buried in the FAQ when they would be stronger in the main body?
- Are my calls to action being treated differently from normal contextual links?
- Is the final HTML safe to paste back into WordPress?
That last point matters more than people think.
A lot of internal linking tools focus on suggestions. However, they do not always protect the actual publishing workflow. This tool is designed to help you audit before AI touches the article and verify after AI gives you the updated HTML.
That makes it especially useful for bloggers, WordPress users, affiliate marketers, and content creators who want control over their content instead of blindly trusting automation.
Why Internal Linking Matters for Blog SEO
Internal links help connect your content together.
That sounds simple, but it affects several important parts of SEO.
First, internal links help search engines discover more of your content. If you publish a new article but no other post links to it, that page may sit isolated for longer than necessary. Internal links give search engines more paths to crawl your site.
Second, internal links help search engines understand topic relationships. If several posts about PEMF therapy, red light therapy, TENS therapy, and chronic pain all link together naturally, that creates a stronger topical structure than having each post sit alone.
Third, internal links help distribute authority across your site. When a stronger page links to a newer or less visible page, it can help that page gain more attention.
Fourth, internal links improve user experience. A reader who lands on one article may want more detail, a related guide, a review, a comparison, or a next step. Smart internal links help them continue their journey instead of leaving your site.
Finally, internal links can support your business goals. You can guide readers toward pillar posts, category hubs, product reviews, lead capture pages, tools, and conversion-focused content without making the article feel forced.
Internal linking is not just an SEO trick.
It is part of how your website guides people.
The Problem With Manual Internal Linking
Manual internal linking sounds easy until you try to do it properly across dozens or hundreds of blog posts.
The more content you publish, the harder it becomes to remember what should link where.
A typical manual workflow looks something like this:
You open a blog post.
You think of a few related articles.
You search your site for the URLs.
You paste them into the post.
You add a few links.
Then you realize you may have already linked that same URL somewhere else in the article.

Then you check the FAQ.
Then you notice the article has image links, Click to Tweet links, category links, lead capture links, or a Calendly link.
Then you wonder whether those count as duplicates.
Then you paste something into WordPress and hope nothing breaks.
That is not a great system.
Here are the most common problems this tool is designed to catch.
Duplicate Contextual Links
A contextual internal link is a normal article link placed inside the content.
For example, if you link the phrase “internal linking strategy” to an article about internal linking strategy, that is a contextual internal link.
In most cases, you do not need to link the same contextual target URL multiple times in the same post.
One clear, natural placement is usually enough.
Duplicate contextual links can make a post feel over-optimized. They can also make your internal link structure less clean.
This tool helps flag duplicate contextual target URLs so you can keep the strongest placement and remove weaker repeats.
Self-Links
A self-link happens when a post links back to itself.
For most blog posts, that is unnecessary and confusing.
If you are editing a post about EMS therapy, you usually do not need to link from that EMS therapy post back to the same EMS therapy URL.
This tool includes a current post URL field so it can detect and skip self-links when they appear in the approved link list.
Weak Anchor Text
Anchor text is the clickable text used in a link.
Weak anchor text includes phrases like:
- click here
- read more
- this article
- check it out
- learn more
Those are not always wrong, but they usually do not give readers or search engines much context.
Better anchor text is natural, descriptive, and relevant.
For example, “internal linking strategy” is more useful than “click here” when linking to an article about internal linking.
This tool does not force anchor text, but the AI prompt it generates tells AI to look for natural contextual placements and avoid awkward links.
FAQ Link Stuffing
A lot of bloggers add links to the FAQ section because it is easy.
The problem is that FAQ links can feel bolted on if every answer suddenly becomes a dumping ground for internal links.
Sometimes the FAQ is the right place.
However, if a link would be stronger in the main body, it is usually better to place it there.
This tool can identify when approved links already exist in the FAQ. The generated AI prompt can then ask AI to move FAQ-only links into stronger body placements when appropriate.

Manual CTAs Getting Treated Like Normal Links
Not every repeated URL is a problem.
For example, you may intentionally link to a Messenger CTA more than once.
You may also link to a 51 Day Challenge, a booking page, a lead capture page, or a product page in multiple places.
Those are not the same as duplicate contextual internal links.
This tool separates contextual link warnings from CTA, lead capture, social, category, external, or supporting link notes.
That way, a repeated Messenger link does not get treated the same as a repeated contextual article link.
Broken HTML or Missing Link Attributes
If you are working with WordPress HTML, you need to be careful.
A small formatting issue can create messy output.
This tool checks for common problems such as:
- contextual links missing target=”_blank”
- contextual links missing rel=”noopener”
- Markdown links inside HTML output
- duplicate contextual target URLs
- image/media links
- manual/supporting links
It gives you a verification step before you paste the updated article back into WordPress.
That is the safety layer most AI workflows are missing.
Why This Tool Uses AI Prompting Instead of Full Automation
This tool does not blindly inject links into your article.
That is intentional.
Fully automated internal linking can sound attractive, but it can also create problems. It may choose awkward anchor text, place links where they do not belong, duplicate URLs, damage formatting, or ignore your business goals.
Instead, this tool gives AI a very specific job.
The tool analyzes the article first.
Then it creates a structured prompt that tells AI exactly what to do and what not to do.
After AI returns the updated article, you paste the result back into the verifier.
That creates a three-step workflow:
- Audit the article before AI touches it.
- Give AI a strict internal linking prompt.
- Verify the output before WordPress paste-back.
That is much safer than letting AI freestyle inside your HTML.
The goal is not to replace your judgment.
The goal is to make your internal linking workflow faster, cleaner, and less risky.
📢 Shareable Insight
“AI should not be trusted to freestyle inside your WordPress HTML. Give it clear rules, then verify the output before you publish.”
👉 Click to Tweet
How the Free Internal Linking Tool Works
The tool follows a simple process.
You add your article details, paste your WordPress HTML, enter approved internal links, analyze the post, generate an AI prompt, run the prompt through AI, then verify the output.
Here is how each step works.
Step 1: Add Your Blog Post Details
Start by adding the basic details for the post you are working on.
These fields help the tool and the AI prompt understand the article.
You can enter:
- Primary keyword
- Post title
- Meta description or article summary
- Current post URL
- Approved internal links
- Full WordPress article HTML
The current post URL is especially important.
That field helps the tool detect self-links.
For example, if you are editing: https://example.com/internal-linking-tool
and you accidentally include that same URL in your approved links list, the tool can flag it as a self-link and skip it.
That stops AI from linking the post back to itself.
Step 2: Add Approved Internal Links
The approved internal links field is where you give the tool the links you want AI to consider.
The safest format is:
Title | URL
For example:
Internal Linking Strategy | https://example.com/internal-linking-strategy/
The title helps AI understand the meaning of the target page.
This is especially useful when the URL slug is unclear.
For example, if a URL looks like this:
the tool cannot understand the topic from the slug alone.
However, if you enter:
Pain Relief Guide | https://example.com/?p=2316
then the AI prompt has enough context to decide where that link might fit naturally.
URL-only entries can still work if the slug is meaningful.
For example: https://example.com/frequency-therapy
The tool can usually infer “Frequency Therapy” from the slug.
However, title plus URL is still better.
Should You Include Category Pages?
Yes, you can include category pages if they are part of your content strategy.
For example, if your Frequency Therapy category page acts like a hub or pillar page, it can make sense to include it as an approved internal link.
The best format would be:
Frequency Therapy Hub | https://example.com/category/frequency-therapy/
That tells AI the page is not just a random archive. It is a deliberate hub page.
Category links can be useful when they help readers explore a broader topic cluster.
Just do not use them randomly.
Use them when they genuinely support the article and site structure.

👉 GO HERE for All The Free Tools
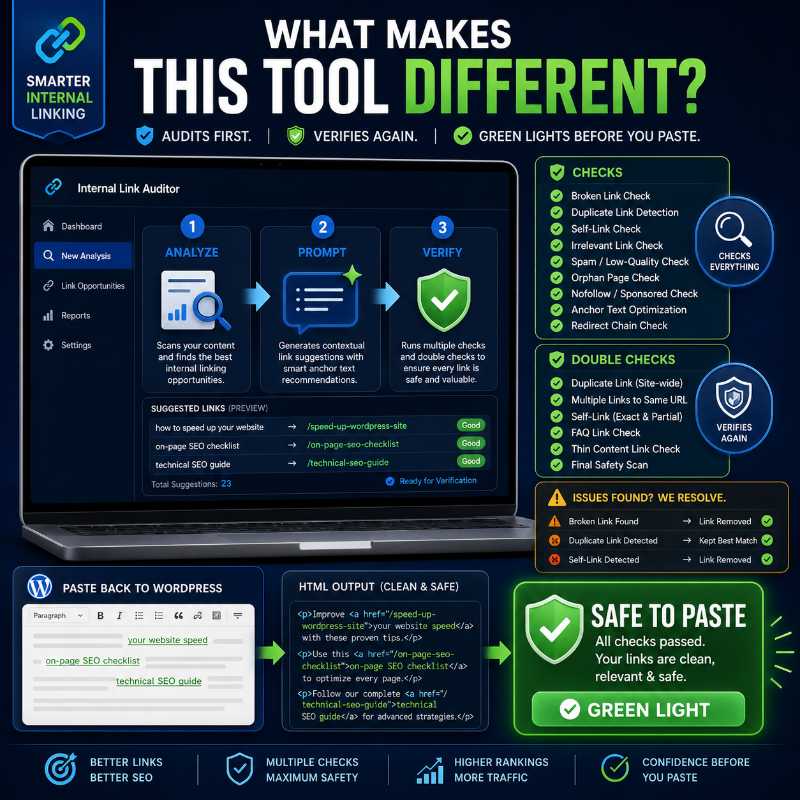
Step 3: Analyze the Post
Once your article HTML and approved links are added, click Analyze Post.
The tool checks the post and gives you a detailed audit.
The audit can show:
- approved links already used
- approved links still available
- self-links skipped
- approved links excluded before insertion
- duplicate approved URLs
- manual/supporting links left unchanged
- image/media links detected
- duplicate contextual URL warnings
- duplicate CTA/supporting notes
- missing target blank warnings
- missing noopener warnings
- Markdown link warnings
- FAQ placement warnings
- protected blocks
This is the pre-AI safety check.
It helps you see what is already happening inside the article before asking AI to make changes.
That matters because AI should not be guessing from scratch.
It should know what links already exist, which links are approved, which ones are self-links, and which links should be left alone.
Step 4: Generate the AI Prompt
After analyzing the article, click Generate AI Prompt.
The tool creates a structured prompt you can copy into ChatGPT or another AI assistant.
The prompt tells AI to:
- preserve the original WordPress HTML
- use only approved URLs
- avoid duplicate contextual target URLs
- skip self-links
- use natural anchor text
- avoid forcing every link
- move FAQ-only links into stronger body placements when appropriate
- leave manual CTAs and supporting links alone
- keep image/media links unchanged
- return an internal linking report
This is where the tool becomes more powerful than a simple link checker.
Instead of just telling you what might be wrong, it helps you create a better AI editing workflow.
The prompt gives AI boundaries.
That reduces the chance of messy output.
Step 5: Verify the AI Output
After AI returns the updated article, do not paste it straight into WordPress.
Paste the article-only HTML into the verifier first.
The verifier checks the final output for issues like:
- duplicate contextual URLs
- duplicate CTA/supporting notes
- missing target=”_blank”
- missing rel=”noopener”
- Markdown links
- image/media links
- manual/supporting links
This step is important.
AI may do a good job overall but still miss a link attribute, duplicate a URL, or leave Markdown formatting in the HTML.
The verifier gives you a final safety check.
If the tool says the output is safe to paste, you can copy the verified HTML and paste it back into WordPress with more confidence.
If the tool shows warnings, review them first.
Some warnings are real problems.
Others are simply notes.
For example, repeated Messenger or lead capture links may be intentional. Those are different from duplicate contextual links.
What Makes This Internal Linking Tool Different?
There are plenty of SEO tools that suggest internal links.
This tool is different because it focuses on the full workflow.
It does not just suggest links.
It helps you prepare the article, guide AI, and verify the result.
It Separates Contextual Links From CTAs
This is one of the most important features.
A normal contextual link and a call-to-action link do not serve the same purpose.
A contextual link helps readers move to related content.
A CTA link asks readers to take an action.
For example:
- Book a call
- Message me
- Join the challenge
- Download the guide
- Visit the tool page
You may intentionally use those links more than once.
This tool separates duplicate contextual URL warnings from duplicate CTA/supporting notes.
That way, the tool can still warn you without making every repeated conversion link look like an SEO problem.
It Detects Self-Links
Self-links are easy to miss when you are working with a long list of approved URLs.
This tool checks the current post URL against your approved links.
If the approved link matches the current post, the tool skips it.
That keeps your internal linking cleaner.
It Handles FAQ Links More Carefully
FAQs can be useful, but they are often overused for internal links.
This tool can detect links that already live in the FAQ section.
It can also flag when the FAQ section appears before the final thoughts or conclusion.
However, it does not automatically move the FAQ section.
That matters because sometimes FAQs are intentionally placed before a CTA to overcome objections.
The tool gives you the warning, but you make the decision.
It Treats Image Links as Informational
WordPress posts often contain image links, media links, and attachment URLs.
These can show up in the article HTML, but they are not the same as contextual internal links.
This tool lists image/media links as informational.
That helps you see what is there without turning normal image links into scary errors.
It Helps Protect WordPress HTML
When you are editing article HTML, formatting matters.
The tool is designed to help avoid accidental damage to:
- custom HTML blocks
- scripts
- embeds
- image links
- CTA sections
- social share links
- lead capture links
- existing formatting
The goal is to improve internal linking without breaking the post.
That is why the verifier step matters so much.
When Should You Use This Tool?
You can use this tool whenever you want to improve internal links inside a blog post.
It is especially useful when you are:
- updating an old blog post
- publishing a new SEO article
- building a content cluster
- adding links to a pillar post
- linking supporting articles together
- cleaning up FAQ-heavy internal links
- improving WordPress SEO
- building topical authority
- adding category hub links intentionally
- using AI to update blog content
- checking AI output before publishing
This is not just for advanced SEOs.
It is also useful if you are a blogger who wants a better workflow.
If you know which pages you want to link to, this tool helps you place them more safely and naturally.
Best Practices for Internal Linking
Internal linking works best when it feels natural.
The goal is not to cram every possible link into every article.
The goal is to guide readers to useful next steps.
Here are some practical best practices.
Use Relevant Links Only
Do not add a link just because you have a related keyword somewhere in the article.
The linked page should genuinely help the reader.
If the connection feels weak, skip it.
A smaller number of strong links is better than a long list of forced ones.
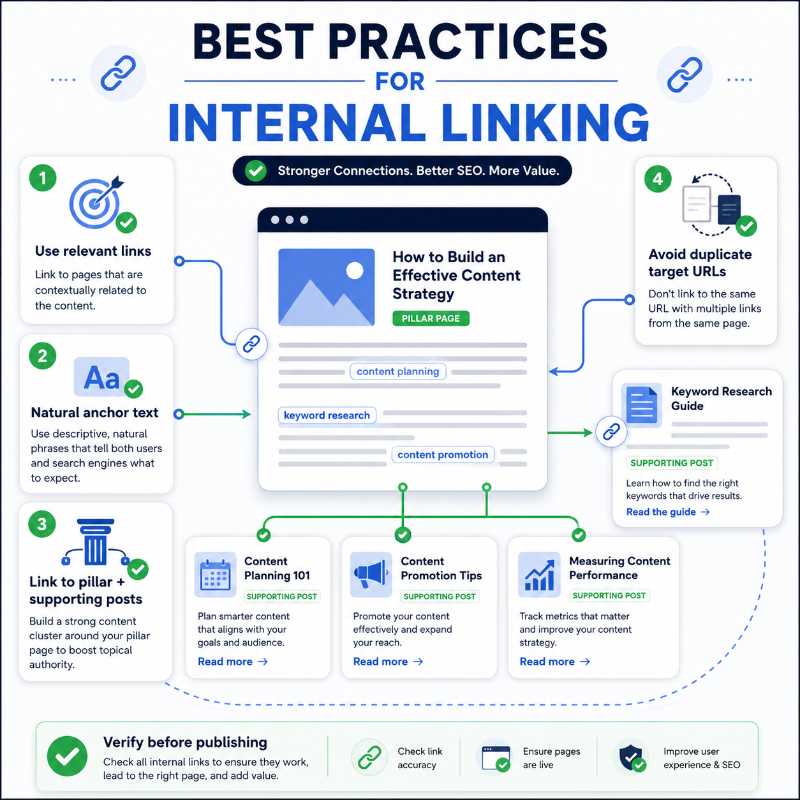
Prioritize Pillar Posts and Supporting Articles
Your internal links should support your site structure.
For example, a pillar post can link to supporting articles, and supporting articles can link back to the pillar post.
This helps create a clear content cluster.
If you have category hubs that are written like useful landing pages, you can also use those strategically.
Use Natural Anchor Text
Anchor text should fit the sentence.
Do not force exact-match keywords everywhere.
For example, if the target page is about internal linking strategy, you might use anchor text like:
- internal linking strategy
- build a stronger internal linking structure
- improve your internal links
- link related blog posts together
All of those can work depending on the sentence.
Natural anchor text usually beats robotic anchor text.
Avoid Duplicate Contextual Target URLs
In most cases, one contextual link to a target URL is enough.
If the same URL appears multiple times in the article body or FAQ, choose the strongest placement.
The strongest placement is usually the one that gives the reader the clearest reason to click.
Keep CTAs Separate From Normal Internal Links
Calls to action are different.
A repeated Messenger link, booking link, or lead capture link may be intentional.
Do not treat every repeated URL as a mistake.
That is why this tool separates duplicate contextual warnings from CTA/supporting notes.
Verify Before Publishing
Always verify AI output before pasting it back into WordPress.
AI can be helpful, but it can still make small mistakes.
A verifier step protects you from problems that are easy to miss manually.
📢 Shareable Insight
“Internal linking is not about adding more links everywhere. It is about creating smarter pathways through your website.”
👉 Click to Tweet
Common Internal Linking Mistakes
Internal linking can help your blog, but it can also get messy if you do it without a system.
Here are some common mistakes to avoid.
Adding Too Many Links
More links do not automatically mean better SEO.
If every second sentence has a link, the article becomes distracting.
Add links where they genuinely support the reader.
Linking to the Same URL Repeatedly
A repeated CTA may be fine.
A repeated contextual link is usually unnecessary.
If the same article link appears several times, keep the strongest placement and remove the weaker ones.
Only Linking From the FAQ Section
FAQ links are easy to add, but they are not always the best placements.
If the main article body has a stronger natural sentence, use that instead.
Using Vague Anchor Text
Avoid lazy anchors when possible.
Instead of linking “click here,” use text that describes the target page.
Readers should understand what they are clicking before they click.
Linking Unrelated Posts
Internal links should make sense.
If the page does not help the reader continue their journey, it probably does not belong in that article.
Forgetting Old Posts
Old posts often need internal linking updates.
As your site grows, you publish new content that should be linked from older articles.
This is one of the easiest ways to strengthen a content cluster over time.
Trusting AI Output Without Checking It
AI can save time, but it should not be the final authority.
Always verify the output.
Check the links.
Preview the post.
Then publish.
Who Is This Tool For?
This free internal linking tool is built for people who publish content and want a cleaner SEO workflow.
It is useful for:
- bloggers
- WordPress site owners
- affiliate marketers
- content creators
- niche site builders
- SEO beginners
- online business owners
- creators building content clusters
- anyone using AI to update blog posts
You do not need to be an SEO expert to use it.
You just need a list of approved links and a blog post you want to improve.
The tool helps with the rest.

How This Tool Helps With Content Clusters
If you are building topical authority, internal linking becomes even more important.
A content cluster usually includes:
- a pillar post
- several supporting articles
- comparison posts
- review posts
- category hubs
- tools
- conversion pages
Internal links help connect those assets.
For example, if you have a cluster about frequency therapy, you might link between posts about PEMF therapy, terahertz therapy, red light therapy, TENS therapy, chronic pain, inflammation, and related device reviews.
That structure helps readers explore the topic.
It also helps search engines understand that your site covers the topic in depth.
This tool makes that process easier because you can provide the exact approved links you want AI to consider.
That keeps the workflow strategic.
Why Approved Links Matter
The approved links list is one of the most important parts of the tool.
You do not want AI inventing URLs.
You also do not want AI deciding which pages matter most without guidance.
By giving it approved links, you stay in control.
You decide which pages should be considered.
The tool then helps AI place them naturally.
This is much safer than asking AI to “add some internal links” and hoping for the best.
Should You Use Category Pages as Internal Links?
Sometimes, yes.
A category page can be more than a basic archive.
If you have written a strong category description, organized the posts well, and turned the category into a useful hub, then linking to it can make sense.
For example, a Frequency Therapy category page could act like a hub that helps readers explore the whole topic.
That can be valuable for both readers and site structure.
However, category links should still be intentional.
Do not add them just because they exist.
Use them when they help readers understand the broader topic or move deeper into a content silo.
What to Do After Updating Internal Links
After you paste the verified HTML back into WordPress, do a quick manual review.
Check that:
- the article still looks normal
- headings are unchanged
- images still display correctly
- CTAs still work
- links open as expected
- no strange formatting appears
- the article still reads naturally
Then update the post.
You may also want to resubmit the URL in Google Search Console or Bing Webmaster Tools if you made meaningful updates.
That is optional, but it can help search engines discover the refreshed version sooner. Once the page is cleaned up internally, you can also look for realistic backlink targets with the Free Backlink Opportunity Finder, or check resource pages with the Free Broken Link Checker.
Final Thoughts
Internal linking is one of the most practical ways to improve your blog’s structure, support your content clusters, and guide readers toward your best pages.
However, it needs to be done carefully.
If you add too many links, duplicate the same target URL, use weak anchor text, or let AI edit your HTML without verification, you can create more problems than you solve.
That is why this free internal linking tool uses a safer workflow.
First, you audit the post.
Then, you generate a structured AI prompt.
Finally, you verify the output before pasting anything back into WordPress.
It is not about stuffing more links into your content.
It is about creating smarter pathways through your website.
👉 Use the Free Internal Linking Tool above to analyze your blog post, generate your AI prompt, and verify your internal links before publishing.
Frequently Asked Questions
What is an internal linking tool?
An internal linking tool helps you find and manage links between pages on your own website. For bloggers, this can make it easier to connect related posts, guide readers to useful next steps, and build a stronger site structure. Instead of randomly adding links after writing, you can review your content more strategically and choose links that genuinely support the reader’s journey.
How does this free internal linking tool work?
This free internal linking tool uses a simple three-step workflow. First, you paste in your blog post HTML and your approved internal link options. Then, the tool helps you generate a structured AI prompt for contextual link placement. Finally, you paste the AI output back into the verifier so it can check for duplicate URLs, missing attributes, Markdown links, and other issues before you copy the verified HTML back into WordPress.
Can I use this internal linking tool with WordPress?
Yes. The tool is designed with WordPress HTML workflows in mind. You can copy your article HTML from WordPress, paste it into the tool, generate an AI prompt, verify the updated output, and then paste the cleaned HTML back into your post. This is especially useful if your article includes FAQ sections, buttons, custom HTML blocks, embedded tools, or formatting you do not want to damage.
Does the tool automatically insert links into my website?
No. The tool does not automatically edit your live website or blindly insert links without review. Instead, it helps you create a stricter AI prompt and then verify the AI-assisted output before publishing. This gives you more control over which URLs are used, where links are placed, and whether the final HTML is clean enough to paste back into WordPress.
Why do I need to enter approved internal links?
Approved links tell the tool which URLs are allowed to be used. This helps stop AI from inventing random URLs, choosing unrelated pages, or linking to content that does not support your strategy. It also makes the final internal linking process cleaner because you are working from a controlled list of target pages instead of letting AI guess what exists on your website.
What is the Title | URL format?
The Title | URL format gives the tool both a readable page title and the target URL. For example, you might enter something like: Internal Linking Strategy | https://example.com/internal-linking-strategy/. This helps the AI understand what the target page is about before suggesting anchor text or placement. You can paste URLs only, but titles usually give the tool better context.
Can I paste only URLs without page titles?
Yes, you can paste URLs only, especially if the URL slug clearly explains the page topic. However, if the URL is vague, shortened, or uses a post ID, it is better to add a title before the URL. A clear title helps the AI understand whether the page is a guide, tool, review, checklist, category hub, or supporting article before it tries to place the link.
Can I use category pages as internal links?
Yes. Category pages can be useful internal link targets when they act like genuine topic hubs. For example, a category page with a helpful introduction, relevant posts, and a clear theme can help readers explore a broader subject. However, avoid linking to thin or empty category pages just to add more links. The page should help the reader continue their journey.
Will this tool detect self-links?
Yes. If you enter the current post URL, the tool can detect when one of your approved links matches the article you are editing. That matters because linking a post to itself usually does not help the reader and can make your internal linking report confusing. The tool can flag or skip self-links so you can focus on better opportunities.
What is a contextual internal link?
A contextual internal link is a link placed naturally inside the main content of a blog post. It usually appears within a sentence or paragraph where the linked page adds useful extra information. For example, if you mention keyword research in a post about SEO writing, linking that phrase to a keyword research guide would be contextual. These links often feel more helpful than random sidebar, footer, or navigation links.
How many internal links should I add to a blog post?
There is no perfect number of internal links for every article. A short post might only need a few links, while a long guide may naturally support more. The better question is whether each link helps the reader understand the topic, compare options, take the next step, or explore a related idea. One strong contextual link is usually better than five forced links added only to hit a number.
Is it bad to link to the same URL more than once in one article?
It is not automatically bad, but duplicate links can make an article messy. In most cases, one strong contextual link to a target page is enough. Repeated links may still make sense in navigation, buttons, calls to action, or lead capture sections. However, if the same URL appears multiple times in normal article paragraphs, you should usually keep the strongest placement and remove the weaker duplicates.
What are duplicate contextual URL warnings?
Duplicate contextual URL warnings appear when the same normal article link target shows up more than once. This helps you spot cases where AI may have linked to the same page repeatedly in the main body of the article. The fix is usually simple: keep the most natural and useful placement, then remove the weaker duplicate. That keeps the article cleaner and avoids making your links feel repetitive.
Why are CTA duplicates treated differently?
CTA links often serve a different purpose from normal contextual links. For example, a Messenger link, Calendly link, lead magnet, product page, or signup page may appear more than once because it is part of your conversion path. This tool separates those supporting or CTA-style duplicates from normal contextual duplicate warnings, so you do not accidentally remove links that are intentionally repeated.
Why does the tool detect image, media, and Markdown links?
WordPress posts often include image links, media file links, lightbox links, buttons, or embedded elements inside the HTML. The tool detects these so you know they exist, but it does not treat them the same way as normal contextual links. It can also flag Markdown-style links, such as links written with brackets and parentheses, because final WordPress output should usually use normal HTML anchor tags instead.
Should FAQ sections include internal links?
FAQ sections can include internal links when the link genuinely helps answer the question. However, you do not need to add links to every FAQ just for SEO. In many cases, the main body of the article is a better place for important contextual links because the surrounding paragraph gives the link more meaning. Use FAQ links sparingly and only when they help the reader go deeper.
What should I check before publishing updated internal links?
Before publishing, check that every link points to the correct page, uses natural anchor text, and fits the surrounding sentence. You should also check for duplicate contextual URLs, missing link attributes, Markdown links, self-links, and formatting problems. Most importantly, make sure you copy the verified HTML back into WordPress rather than pasting unverified AI output directly into your live article.